This chapter contains the following topics:
This chapter explains how to set up and modify authorized users for accessing Passport Business Solutions.
When Passport Business Solutions is started it will prompt for a User ID. In order to gain access to any of the PBS menus, a valid User ID must be entered and authenticated against a valid password.
At least one User ID must be defined to use your Passport Business Solutions software. Passport recommends that one User ID be defined for each user that will be using the system. This ID is used in various areas within the software to document changes that occur within the system and also increases security.
Users in the Passport Business Solutions system are defined as either Administrative or General users.
Administrative users are granted complete access to the PBS system for all companies that are being processed. They are allowed unlimited access in order to carry out their responsibilities as Administrators.
| • | Only Administrative users have access to the User maintenance menu on the PBS CTL Setup menu. |
| • | Only Administrative users are allowed access to the PBS data recovery utilities, initialization utilities add company, Path finder and more. |
| • | Administrative users can perform BreakOut™ maintenance for themselves and any other valid User ID. |
| • | In Graphical mode an Administrative user may set up screens as View only for any General user. On the User maintenance screen the Administrative user may copy View only settings from one General user to another. |
| • | Administrative users have access to the entire PBS menu, based on the modules that are installed on your system, at all times. |
General users have certain restrictions:
| • | General users are not allowed access to the menu selections of User maintenance or Menu maintenance. |
| • | General users are not allowed to run data recovery or initialization utilities. |
| • | General users can only adjust their own BreakOut settings. BreakOut is a feature in character mode only. |
| • | A General user may be assigned a default system menu or assigned a custom menu, by Company ID. A custom menu restricts access to certain PBS menu selections assigned in Menu maintenance. |
| • | General users may be able to View only certain Graphical mode screens based on a setup by an Administrative user. When assigned a View only screen, that General user may not view the screen in Character mode. This is done using MySet. Most of the MySet functions are described in the Data Entry, Myset and BreakOut chapter of the PBS System documentation. Copying MySet settings from one user to another is accessed at Copy MySet View only Settings. |
A password is a string of characters that must be entered before a user can access, retrieve or enter any information stored by the software.
You use passwords to prevent unauthorized individuals from seeing sensitive information, such as salaries in Payroll or financial data in General Ledger. Due to the increased possibility of identity theft, it has become necessary to require passwords for PBS systems.
Your chosen password must be at least 6 characters long and must contain both numbers and alphanumeric characters or uppercase and lowercase alphanumeric characters.
Password Encryption
Passwords can be encrypted. In order to encrypt (or unencrypt if already encrypted) you must run the Encryption Utility. It also encrypts payroll data if you have payroll installed on your system. Instructions for running this utility is found in the Payroll Control information chapter. See the section called Running the Encryption Utility.
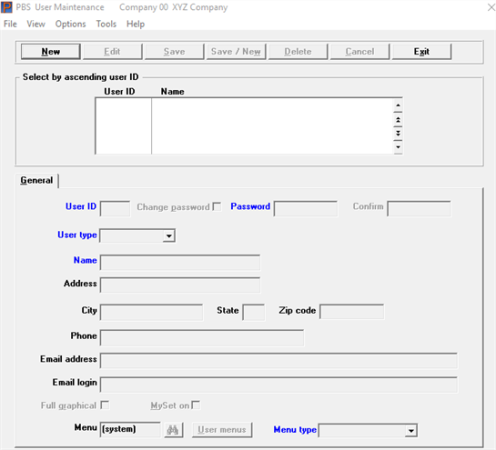
The User maintenance selection is used to define the individual users that will be working with PBS software. Use this selection to define 1) who can log into the system, and 2) assign a custom menu. A custom menu will restrict the user to the companies and menu selections that the user can access.
When you first install PBS, no users are defined. During the first log in, you must use the startup User ID ADM to access PBS. The ADM user initially accesses Graphical mode screens. When on a graphical screen you may switch to character mode by selecting <Sft+F12>.
The first time you set up users you must set up at least one Administrative user. DO NOT FORGET THE TEMPORARY PASSWORD. Defining only a general user and no administration user will make all the administrative functions inaccessible. Defining one or more users will render the ADM login ID invalid. If you do not set up any users, then you may still log in as ADM.
|
Note |
After you have entered at least one Administrative user, you may want to consider the kind of security issues that must be confronted for your particular installation. If you will be restricting access of the Passport Business Solutions system on a user by user basis, you should read the chapter PBS Menus before you set up all of your General users. Because system restrictions are defined by custom menus and each restricted user will be assigned a custom menu, it might be appropriate to define your custom menus before you enter your users. |
Select
User maintenance from the CTL Setup menu. This selection is only available to Administrative users.
Graphical Mode
You may add new users or edit existing users on this screen.
The list box displays up to 6 users at a time. You may sort the users by user ID in ascending or descending order. Click on the column name or the arrow to the right of the column name to change the sort or use the View options. Only column names in red may be sorted.
To locate a user start typing the user ID or use the arrow keys, <PgDn>/<PgUp>, and <Home>/<End> keys to find the order. The <F1> and <SF1> work the same as the arrow keys.
When a user is found, to edit the record you may select <Enter>.
To access the buttons you may click on them with the mouse or use the Tab key for access. When the focus is on a key use the <Enter> key to select it. Keyboard equivalents are also available:
| Button | Keyboard | Description |
|---|---|---|
|
New |
Ctrl+n |
To enter a new user. |
|
Edit |
Ctrl+e |
To edit an existing user. |
|
Save |
Ctrl+s |
To save a new user or changes to an existing user. |
|
Save/New |
Ctrl+w |
This is a combination of the Save and New buttons. |
|
Delete |
Ctrl+d |
To delete an existing user. You may also use the <F3> key. You MUST retain at least one administrative user. |
|
Cancel |
Ctrl+c |
To cancel the addition of a user or editing a user. |
|
Exit |
Ctrl+x |
To exit to the menu. You may also use the <Esc> key. |
Most Graphical mode menu selections are the same from one PBS screen to another. The exceptions for the User maintenance screen are described here:
Options
The options menu has the following choices:
| Selection | Description |
|---|---|
|
Users list |
This prints a list of users entered here. The password is not included. See Users List |
|
User menus |
This allows you to enter menus to be assigned to a user. This screen is not accessible on a system that only has one company. See Multi-company Access Menus |
|
User menus list |
This prints a report of the menu selections assigned to each user. See Users Menu List |
Help
The menu selection that is unique to this screen is MySet (Copy view only). See Copy MySet View only Settings
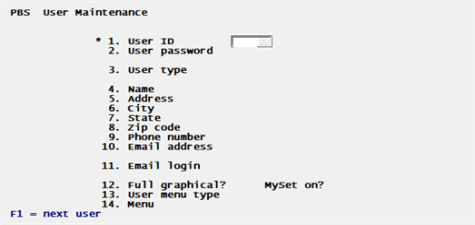
Character Mode
In Character mode the following screen displays:
Options
If you have existing users, you may use one of the character mode options:
|
<F1> |
For the next user |
|
<SF1> |
For the previous user |
|
<F8> |
To select a user from the lookup |
Enter a code to identify the user. This will be the code used at startup to access the Passport Business Solutions system. ADM is reserved for new installations only and cannot be entered here.
|
Format |
Up to three characters. Lower-case is converted to upper-case. |
|
Example |
Type: PSI |
This field only displays in graphical mode.
Check this box if you want to change the user's password. The Password and Confirm fields must be entered after you check this box.
|
Format |
Check box, checked is yes and unchecked is no. The default is unchecked |
|
Example |
Select the <Enter> key to not change the password |
Enter the temporary password that will be entered by this user when logging into the Passport Business Solutions system. Read Passwords for the password requirements.
The password entered here is temporary. You must inform the user of what the temporary password is. When the user logs in they enter the temporary password and then enter and confirm a permanent password. The permanent password cannot be the same as the temporary password.
The password displays as asterisks.
|
Format |
Up to 10 characters |
|
Example |
pbs123 |
If a general user forgets their permanent password, a temporary password must be re-entered here by an administrator. After the password is changed on this screen, the next time the user logs into PBS, he or she will be required to enter the temporary password, then enter and confirm their new password.
Re-enter the temporary password. This is to confirm what was entered in the Password field is what is expected.
|
Format |
Up to 10 characters |
|
Example |
pbs12# |
Select a type for this user. You may define this user as an Administrative user or as a General user. For a full description of the Administrative users and General users rights and restrictions, see User Types.
|
Format |
Drop down list, either Administrator or General |
|
Example |
Select Administration to define this user as an Administrative user. |
Enter the name of the user. This field is required.
|
Format |
Up to 25 characters. |
|
Example |
Type Passport Admin User |
Enter the address of this user or press <Enter> to leave this field blank. This field is optional.
|
Format |
Up to 25 characters. |
|
Example |
Type 3801 West Lake Ave |
Enter this user’s City or press <Enter> to leave this field blank. This field is optional.
|
Format |
Up to 15 characters. |
|
Example |
Type Glenview |
Enter the address of this user or press <Enter> to leave this field blank. This field is optional.
|
Format |
2 characters. |
|
Example |
Type IL |
Enter this user’s Zip code or press <Enter> to leave this field blank. This field is optional.
|
Format |
Up to 10 characters. |
|
Example |
Type 60026 |
Enter this user’s Phone number or press <Enter> to leave this field blank. This field is optional.
|
Format |
Up to 20 characters. |
|
Example |
Type 847-729-7900 |
Enter this user’s email address or press <Enter> to leave this field blank. This field is optional.
|
Format |
60 characters. |
|
Example |
Select <Enter> |
|
Note |
The Email address and Email login fields are used for emailing PDF invoice, statement, purchase order and pay advice type documents stored under the PDFFIL directory to customers, vendors and employees. See the Email Configuration appendix for more information on setting up this feature in PBS. |
If nothing is entered for the Email address field, this field is skipped.
Enter this user’s email login or press <Enter> to leave this field blank. The email login is the SMTP Authentication. If you do not know what this is, contact your Internet Service Provider for help. This field is optional.
For many email configurations, the entry for this field should be the same as the user's email address.
|
Format |
60 characters. |
|
Example |
This field will be skipped based on no entry in the Email address field. |
This field determines the type of screens that the user accesses when entering data. Checked or Y indicates that the user accesses full graphical mode screens where unchecked or N indicates the character mode screens.
In the PBS documentation the two modes are referenced as Graphical Mode and Character Mode.
Some PBS screens are not available in Graphical Mode.
|
Format |
Character Mode: Y for yes and N for no Graphical Mode: Check box, checked for full graphical and unchecked for character |
|
Example |
Select the <Space bar> to check the box |
There is a setting in the cblconfi file for FULL_GRAPHICAL. This setting only effects the PBS login screen. See the COBOL Configuration File appendix. This is a global setting that effects all users.
Graphical / Character Toggle On / Off
No matter what is selected here, from almost every screen on the system that is available in graphical mode, the user can select <Sft+F12> to toggle from Character to Graphical or vice versa. There are a few restrictions to this feature:
| • | You may not switch modes when adding a record or have a record selected in either mode. |
| • | If there are a sequence of screens you may only make the change on the first screen, such as in Print checks and post in A/P. |
| • | If you are using batches, you must select the batch first. When you get to the main screen, select <Shift+F12> and you will have to re-enter the batch number to return to the main screen. |
| • | If you are restricted to a View only per the settings in MySet the user may only view the screen in Graphical Mode. |
MySet is a feature that is only available in Graphical mode.
This field turns the MySet features on or off for the user. Checked or Y indicates that the user has MySet on where unchecked or N indicates MySet is off.
This setting becomes the default whenever a user logs into PBS or changes companies. The user may change it from the default to the other.
The MySet features are different for Administrative user vs. General users. The MySet section of the PBS System chapter called Data Entry, Myset and BreakOut goes into detail on how the MySet features work and how they are setup and used.
|
Format |
Character Mode: Y for yes and N for no Graphical Mode: Check box, checked is Yes and unchecked is no |
|
Example |
Graphical Mode: Select the <Space bar> to check the box Character Mode: Enter Y |
Make any needed changes or press <Enter> to continue.
This selection can only be entered if you are selecting a menu when there is a single company installed. If you have more than one company go to the Multi-company Access Menus section below.
For General users, enter the custom menu for a defined custom menu or press <Enter> to default to the full system menu. For Administrative users, this field cannot be entered. Administrative users are automatically assigned full system access. For more information on user permissions and restrictions by type, see User Types.
|
Format |
Up to 8 characters. |
|
Example |
This field is skipped in this example because the user is an Administrative user. |
This button provides access to the multi-company menu access setup screen, described in the next section.
If you are processing data for more than one company and you are adding a new General user, you need to access a second screen where you may define the company access that will be made available to the user.
Make any needed changes or press <Enter> to continue.
Enter a menu type per user. When an entry is provided here, it overrides the Menu type entered in Company information. You have these options:
|
Character |
Graphical |
Description |
|---|---|---|
|
0 |
Menu bar |
This is the classical look that goes back to the early days of PBS and RealWorld. |
|
1 |
Windows menu |
This is the windows menu where the menu selections are at the top of the main screen. |
|
2 |
Treeview menu |
This displays each menu as a plus, when not open and minus when open. |
|
blank |
Comp menu |
Uses the Company information menu selection. |
|
Format |
Graphical: Drop down list Character: 1 character |
|
Example |
Enter 2 for Treeview menu. |
This screen is used to define General user access in multi-company installations. Since Administrative users are automatically assigned access to all menus for all companies, this screen is only applicable when working with General users. See the User type field for a full explanation of the restrictions for a general uer.
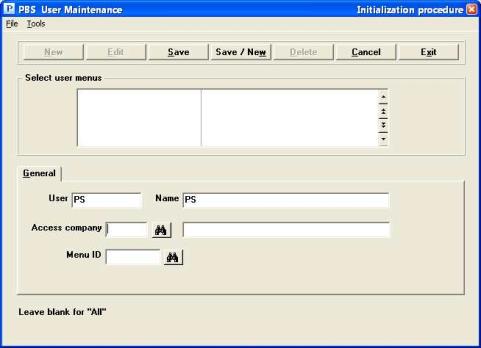
For each User, you may enter as many Company IDs as you have defined. The entry here for a User will define the company information that a user may be granted access to.
Enter a valid Company ID to allow a General user access to that company’s data. Leave it blank for "All" companies.
|
Format |
2 characters |
|
Example |
This field is skipped in this example because the user is defined as an Administrative user |
Enter a valid Menu ID to selectively restrict access to this company’s information for this user.
|
Format |
Up to 8 characters |
|
Example |
This field is skipped in this example because the user is defined as an Administrative user |
You may press <Enter> to default to full system access for this General user.
Make any changes or press <Enter> to continue.
|
Note |
Full system access for General users does not include access to the User maintenance or Menu maintenance selections. It does not include access to the file recovery utilities or file initialization utilities. These functions are reserved for Administrative users. |
Options
You may also use one of the options:
|
<F1> |
For the next menu access record |
|
<F5> |
Copy BreakOut settings for this user. This option is only available in Character Mode as Breakout can only be used in Character Mode |
|
<F3> |
Delete the company access record for this user |
This option is only available in Character mode.
When <F5> is selected to copy BreakOut Settings, then you will be prompted for the following fields:
1. Copy from User ID
Select the User ID from which you want to copy to this user to use the option:
Options
|
<F1> |
For next user on file |
|
Format |
Up to three characters. Lower-case is converted to upper-case. |
|
Example |
Type: PSI |
2. Module to copy
You may select individual modules or use the option:
Options
|
<F1> |
For "All" modules |
|
Format |
Up to two characters. |
|
Example |
Select <F1> for "All" |
3. Overwrite records ?
The user selected may already have BreakOut records on file. Select Y to overwrite the existing BreakOut records for the user selected or N to merge with existing records.
|
Format |
Y for yes or N for No. |
|
Example |
Select Y |
Field number to change ?
Select <Enter> to save your entry or select <Esc> to not save.
This option is only available in Graphical mode.
Select
MySet (Copy View only) from the User maintenance Help menu. You may also select the <F7> key.
From this screen you may copy the View only settings from one user to another. You may also delete settings for the selected user.
The following screen displays:
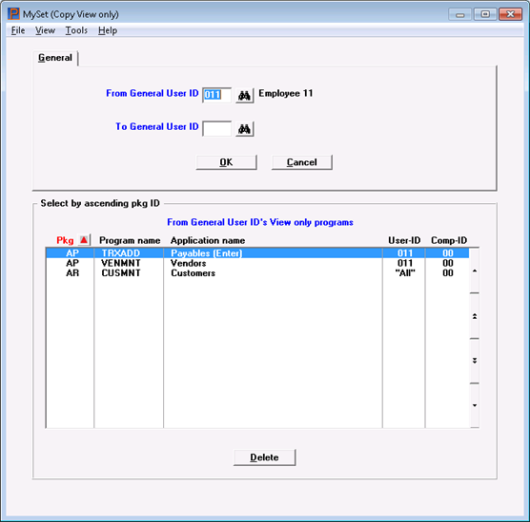
The list box displays the View only records that are assigned to the User entered in the From General User ID field.
Enter the following:
Enter the user ID that you are copying the MySet View only records. It defaults to the User ID selected on the previous screen. You may use the Lookup to access the User ID.
After entering this field:
| • | If you are copying records select <Enter> go to the To General User ID field next. |
| • | If you want to delete View only records click on the List box to select the record you wish to delete. |
Enter the user ID to which you want to copy the View only records.
Select OK to copy or Cancel to return to the User maintenance screen without copying.
Selecting OK copies ALL the From General User ID View only records to the To General User ID. The only exception is noted below.
|
Note |
A View only record that is set up for "All" users cannot be copied because it is already assigned to all users. The User-ID List box column indicates when "All" users have been assigned a View only record. |
If you want to delete a View only record assigned to this user, with your mouse select the record in the list box to be deleted. Then click on the Delete button.
|
Note |
If you delete a View only record that is set up for "All" users it removes it for all users. |
This report prints a list of all users entered in PBS. The users password does not print on the report.
Other than selecting a printer, there are no criteria to enter.
This report is not available in Character mode.
This prints a report of the users that are assigned to a menu. It will only print menus for General users as Administrative users have access to all the PBS menu selections available per the PBS license. Optionally this report can include the menu selections that each user can access on the menu.
If there are no users assigned to a menu it will indicate this. You may print the details of the menu anyway.
This report is not available in Character mode.
Select
Users menu list from the Graphical mode Options menu. The following screen displays:
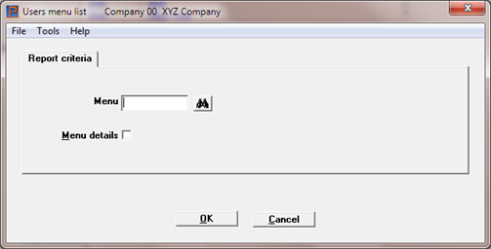
Enter the following:
Select a menu that you want to print. You may use the option:
|
<ENTER> |
For the "System" menu |
Checking this box allows you to print the menu details that are defined for the menu entered in the previous field. Leave it unchecked to print only the users.
Entering menus is described in PBS Menus.
Select OK to print the report or Cancel to report to the User maintenance screen.